In today’s digital age, having a website for your small business is no longer a luxury; it’s a necessity. A well-designed website can help you reach a broader audience, establish your brand, and boost your sales. However, many small business owners hesitate to create a website due to perceived high costs and technical challenges.
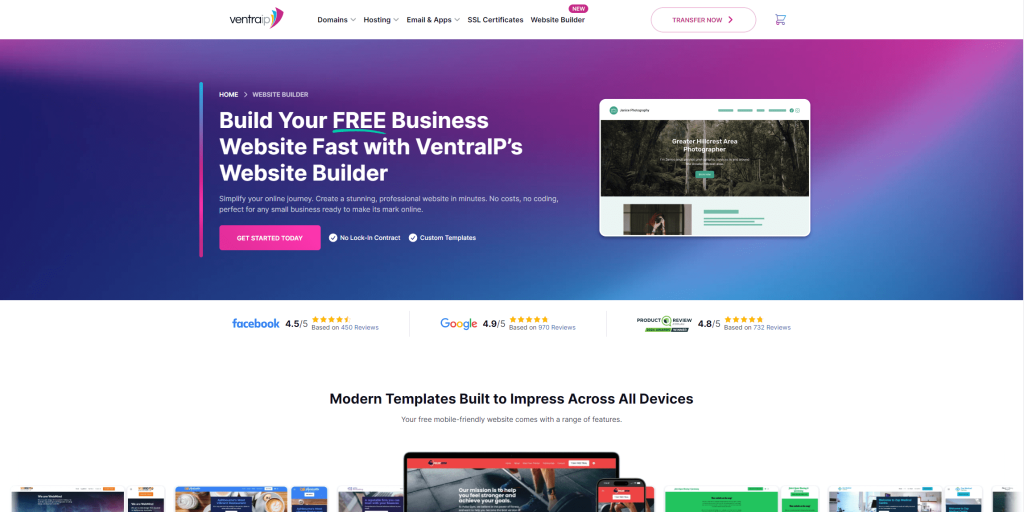
The good news is that creating a website for your small business doesn’t have to be expensive or complicated. With VentraIP’s free website builder, you can build a professional-looking website without breaking the bank. This blog post will guide you through the process of creating a free website for your small business using VentraIP’s intuitive website builder. We’ll cover everything from planning and setting up, to launching and your site. Whether you’re tech-savvy or a complete beginner, you’ll find the tips and resources you need to get started today. Let’s dive in and help your business make its mark online with VentraIP!
Planning Your Website
Before diving into the technical aspects of creating a website, it’s crucial to define your goals. Understanding the purpose of your website and identifying your target audience will guide your design and content decisions, ensuring your site effectively meets the needs of your business and your customers.
Create a website tailored to your target audience
- Identify Your Ideal Customer:
- Demographics: Age, gender, location, income level, education.
- Psychographics: Interests, values, lifestyle, behaviour.
- Professional Attributes: Industry, job role, business size.
- Understand Their Needs and Preferences:
- Pain Points: What problems are they looking to solve?
- Motivations: What drives their purchasing decisions?
- Preferences: What type of content do they engage with? What are their preferred communication channels?
- Tailor Your Content and Design:
- Content: Use language and messaging that resonates with your audience. Provide the information they seek in an engaging format.
- Design: Create a user-friendly layout that appeals to your target audience. Consider their preferences for colour schemes, fonts, and overall aesthetics.
Registering a domain name
Creating a website using our website builder is free, but you will still need to register a domain name to make your website live.
Before You Build Your Free Website
Before you dive into creating your website with VentraIP’s website builder, it’s important to have a few key elements ready. Being prepared with these assets will make the website creation process smoother and more efficient, ensuring your site looks professional and cohesive from the start.
Make a logo for your business
If you don’t have a logo, our website builder can generate one for you based on your business name. Keep in mind that your logo is a crucial part of your brand identity, as It’s often the first thing visitors will notice about your website, and it sets the tone for your entire online presence. For that reason, it is a good idea to have a logo professionally designed.
- Why it matters: A well-designed logo creates a strong first impression, builds trust, and helps differentiate your business from competitors.
- What to do: Ensure your logo is high-resolution. If you don’t have a logo yet, consider using a logo design tool or hiring a graphic designer.
Use High-Quality Images
Our website builder provides access to professional stock photos, so you can build a great looking website without much effort. With that said, using your own high-quality images will help you stand out from the crowd and give your website a unique look.
- Why It Matters: High-quality images make your website more appealing and professional, helping to build credibility and engage your audience.
- What to Do: Gather images that showcase your products, services, team, and anything else relevant to your business. Ensure these images are high-resolution and optimised for web use. If necessary, consider using stock photo websites for additional imagery.
Additional Content Preparation
While your logo and images are essential, having other content elements ready can also help streamline the website creation process.
- Brand Colours and Fonts: Decide on your brand colours and fonts to ensure a consistent look and feel across your website. If you have brand guidelines, keep them handy.
- Contact Information: Have your business address, phone number, email address, and any social media links ready to include on your site.
By having your logo, images, and other content prepared in advance, you’ll be able to make the most of VentraIP’s website builder. This preparation will help you create a polished, professional website that effectively represents your business and engages your visitors from the moment they arrive.
How to Create a Website Using VentraIP’s Website Builder for Free
Watch our step-by-step video guide on how to create a free website using our website builder. Or, feel free to have a read of our written guide below.
Get started by signing up
Getting started is easy. Visit our Website Builder sign-up page and follow the prompts to create an account.
If you have already signed up or come back to this guide later, you can always access your VIPsite by logging into VIPcontrol and navigating to My Services > VIPsites.
Basic Details
Add your business name, logo and category
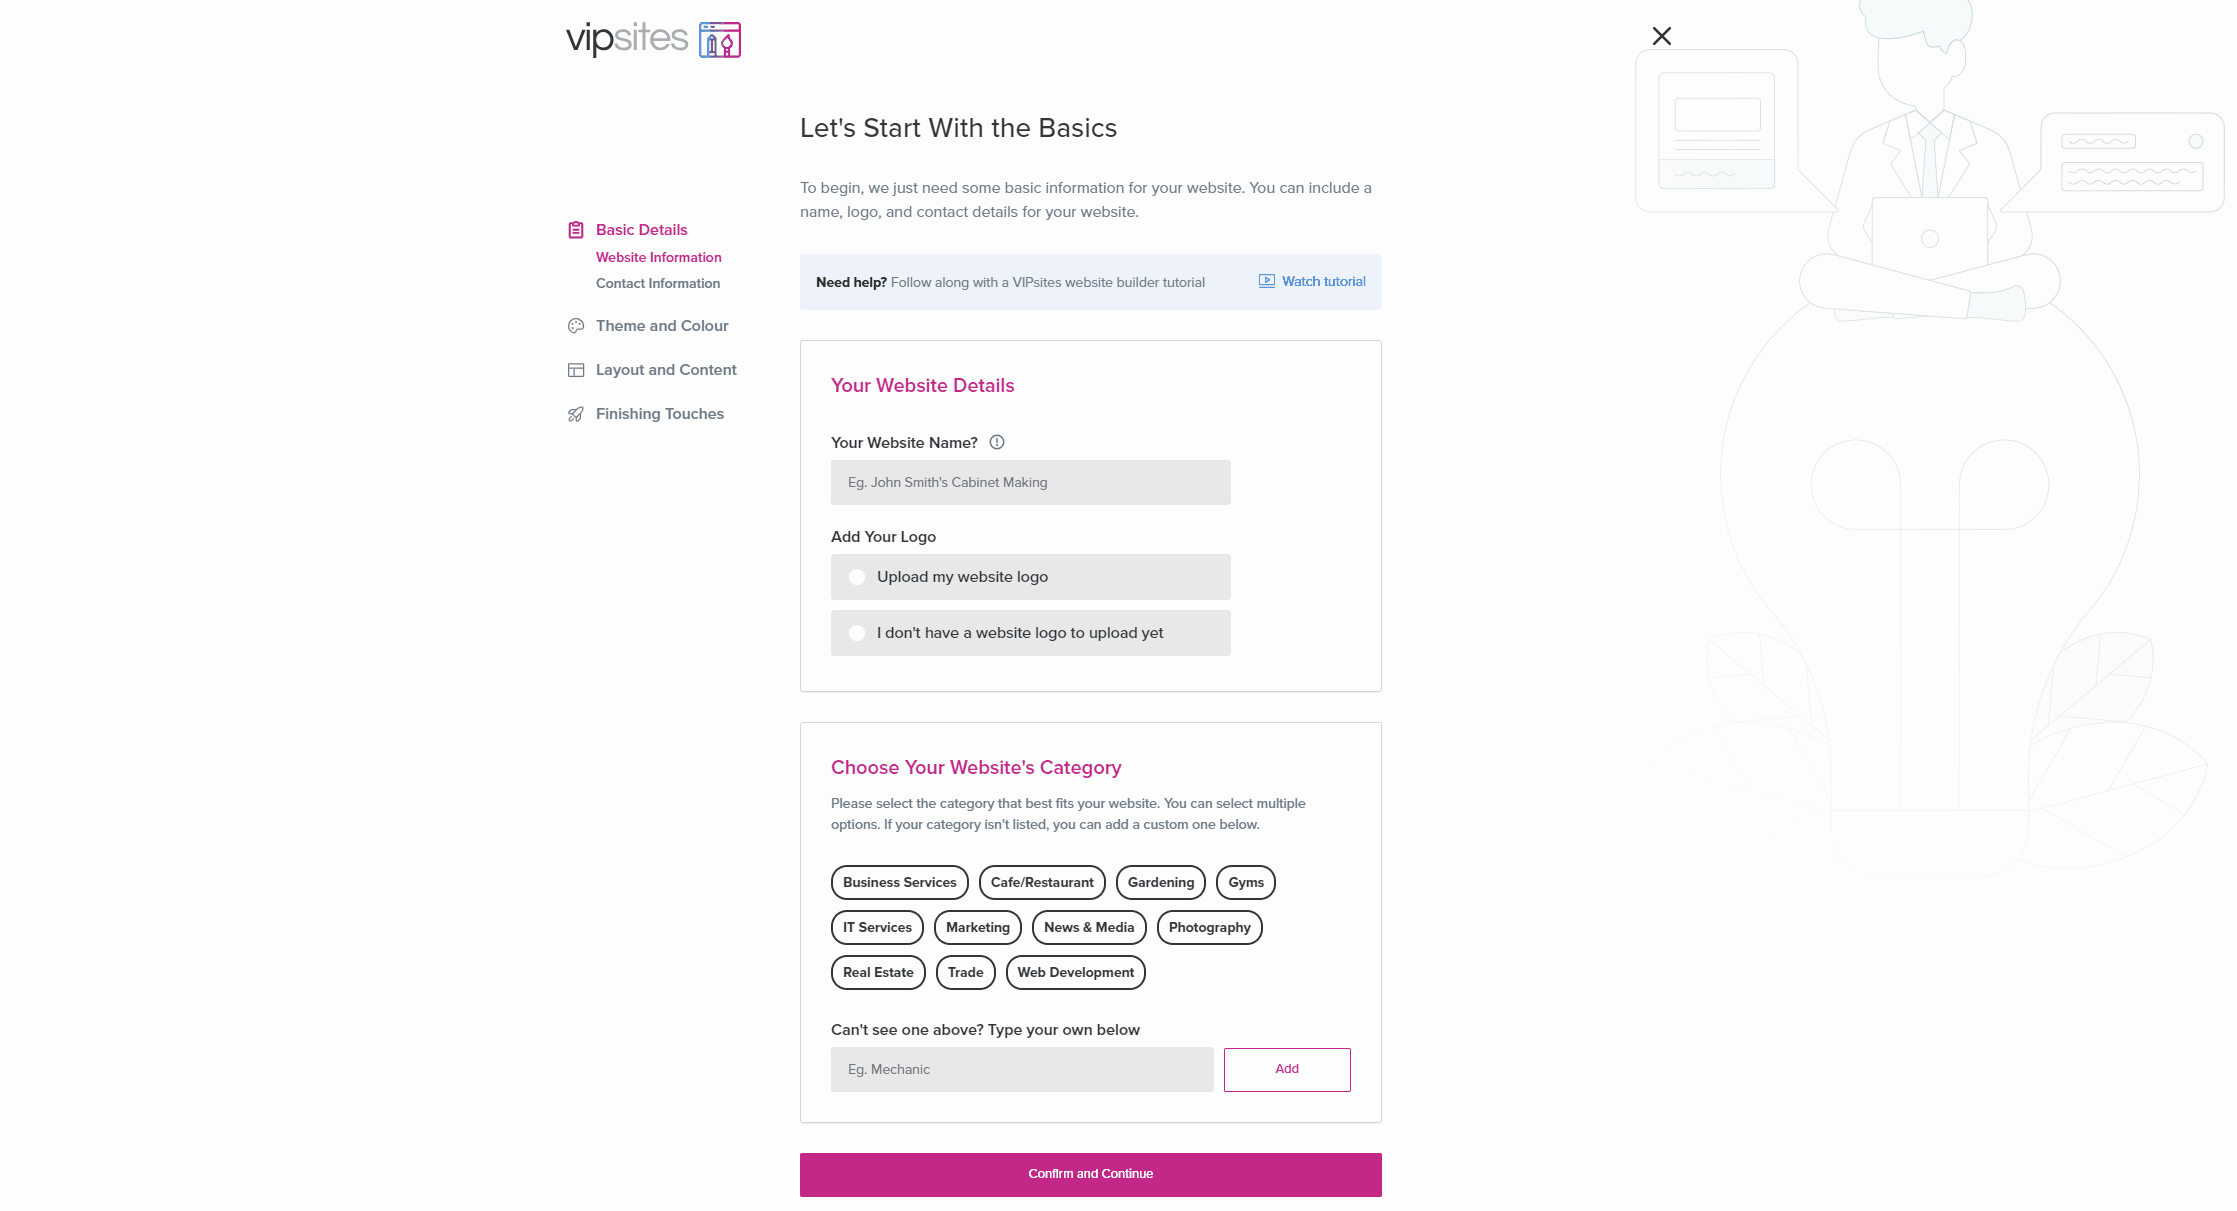
Start by adding your business name and a logo. If you don’t have a logo ready to go, that’s okay! You can select “I don’t have a website logo to upload yet” and use our logo generator (this can be changed later). Then, add a category for your website and click “Confirm and Continue”.
Add your business contact information
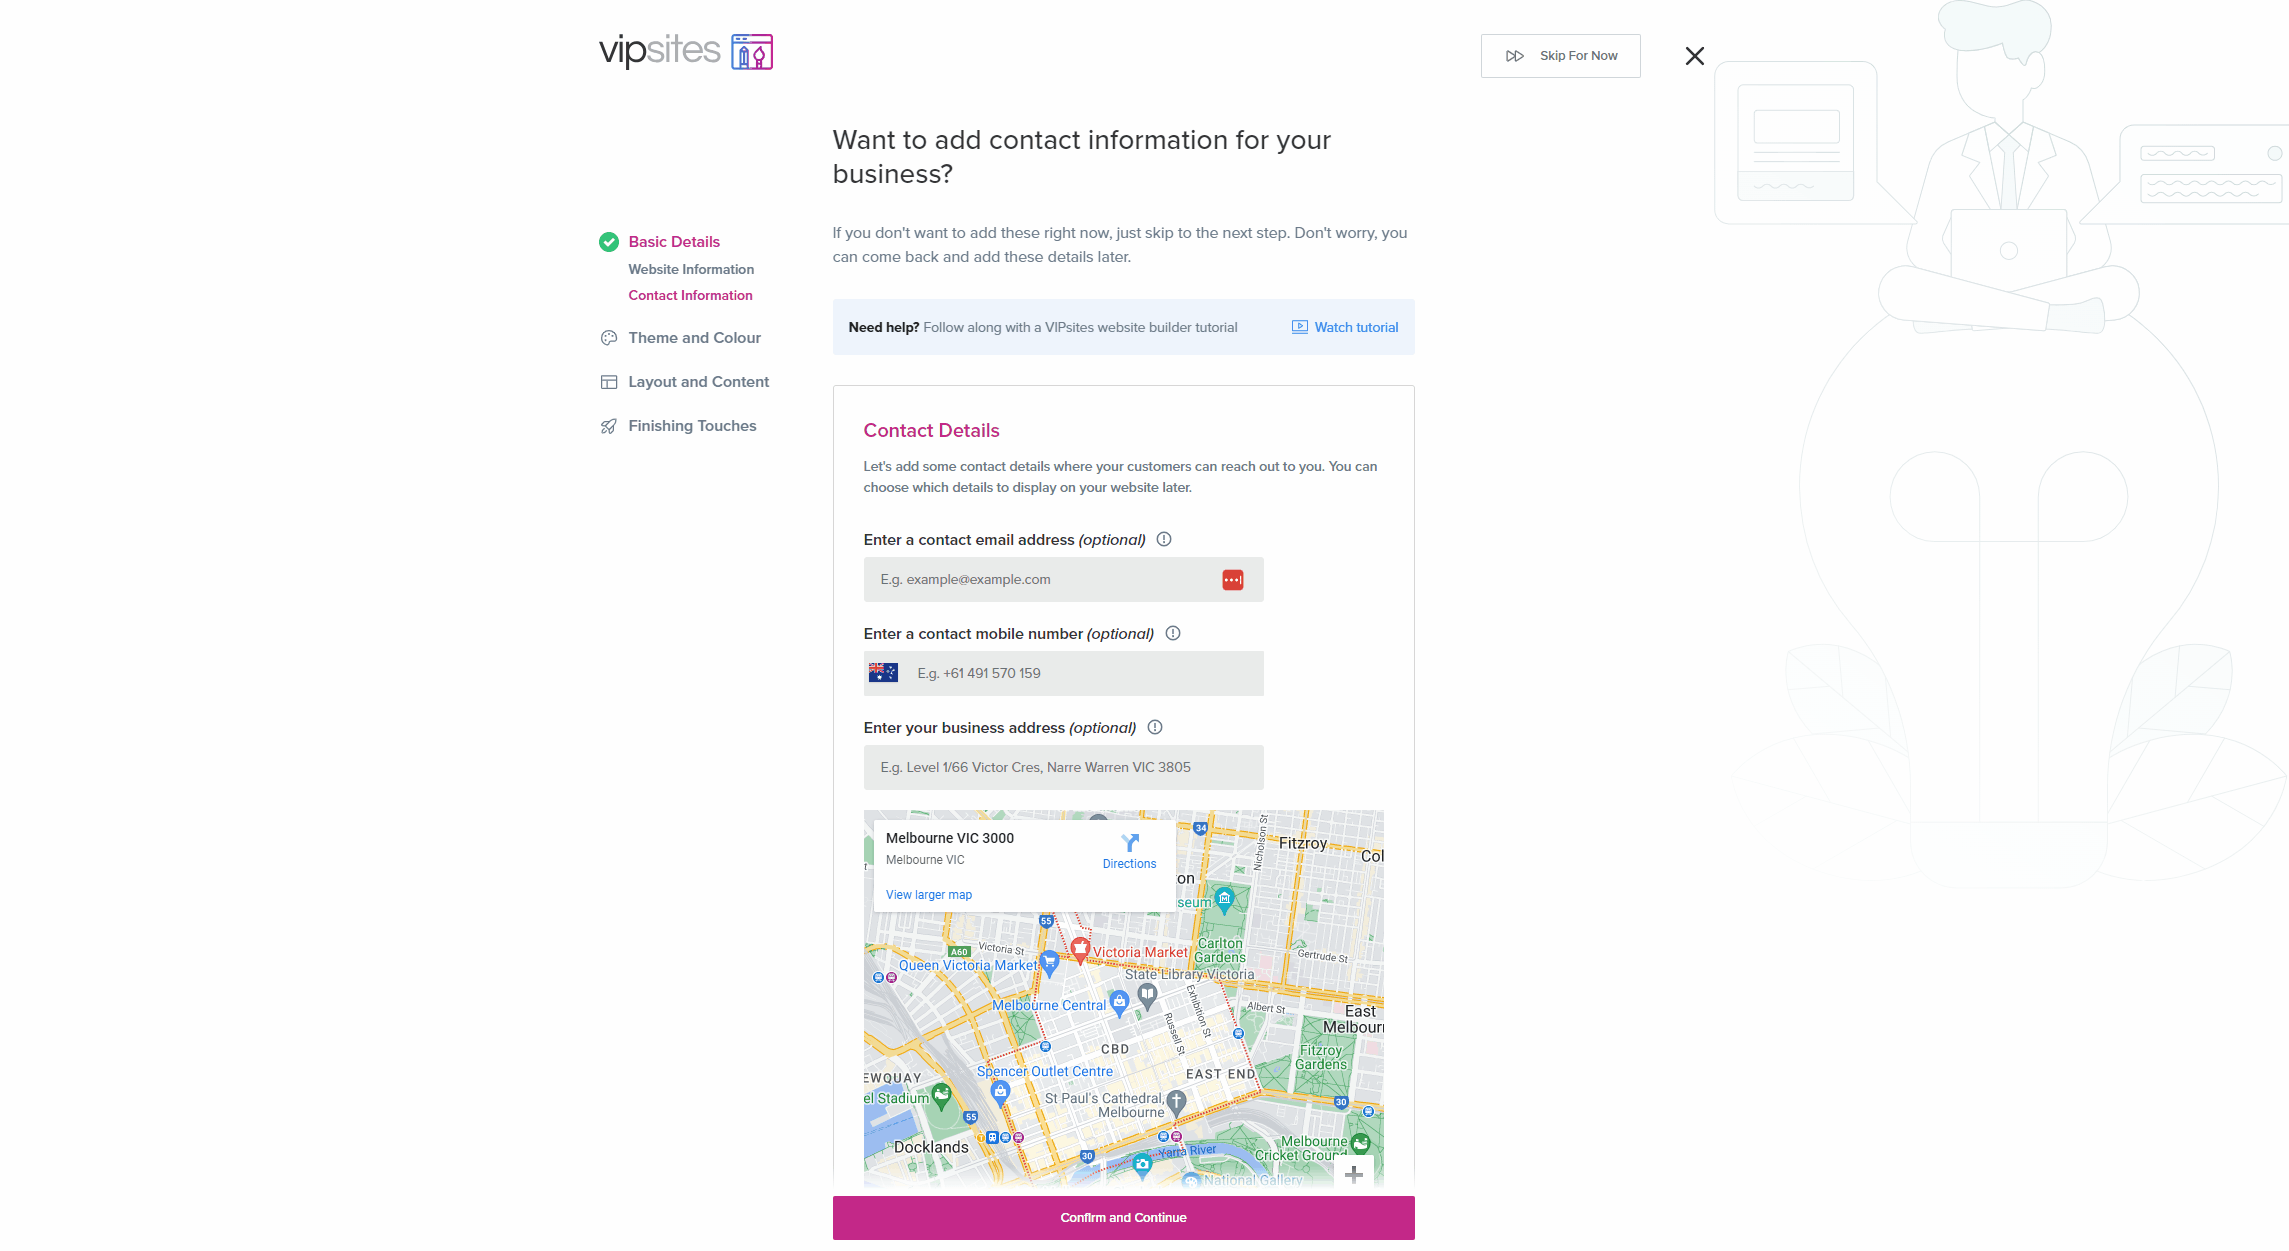
Here, you can provide potential customers with your business’ contact details. You can optionally add the following information:
- Email Address
- Phone Number
- Physical address
- Business operating hours
- ABN or ACN
These details are all optional, so you don’t have to provide them. However, we strongly recommend adding at least one method of contact to help potential customers contact you easily.
Customise your website’s Theme and Colour
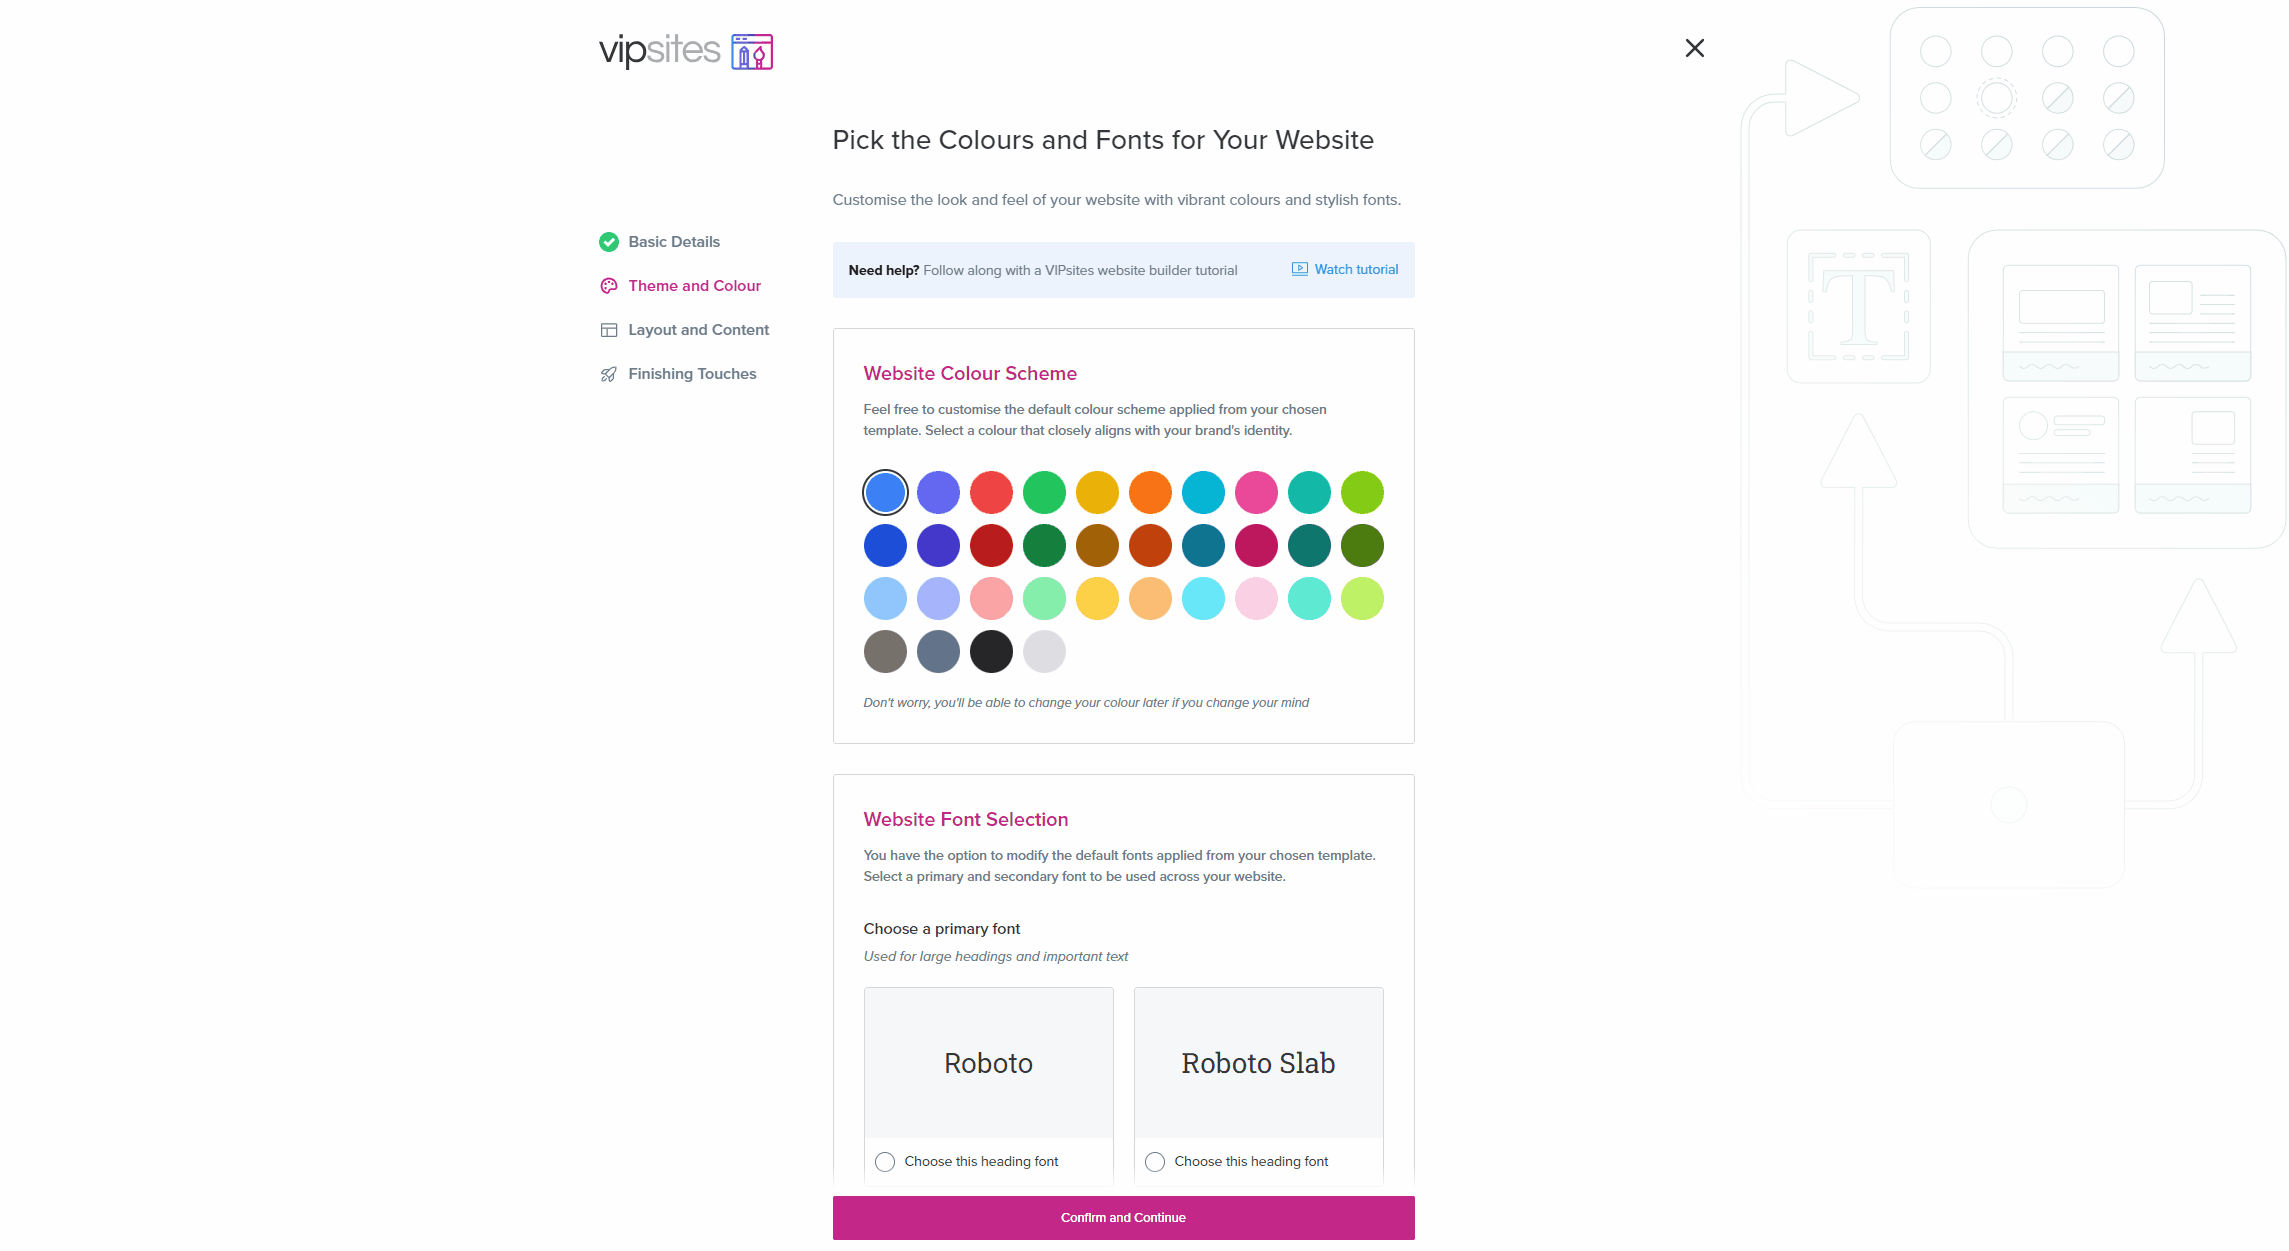
In this section, you can choose your website’s colour scheme and fonts. Here’s a quick overview of each of the options available:
- Choosing your colour scheme: We’ll automatically apply your chosen colour in a pre-defined and visually appealing way. Choose a colour that closely matches your brand’s identity.
- Choosing a Primary Font: This font will be used for large headings and important text.
- Choosing a Secondary Font: This font will be used for small text on your web page.
Need help choosing colours and fonts for your website? Check out these blog posts for more information:
Customising your website’s layout
Choosing a template
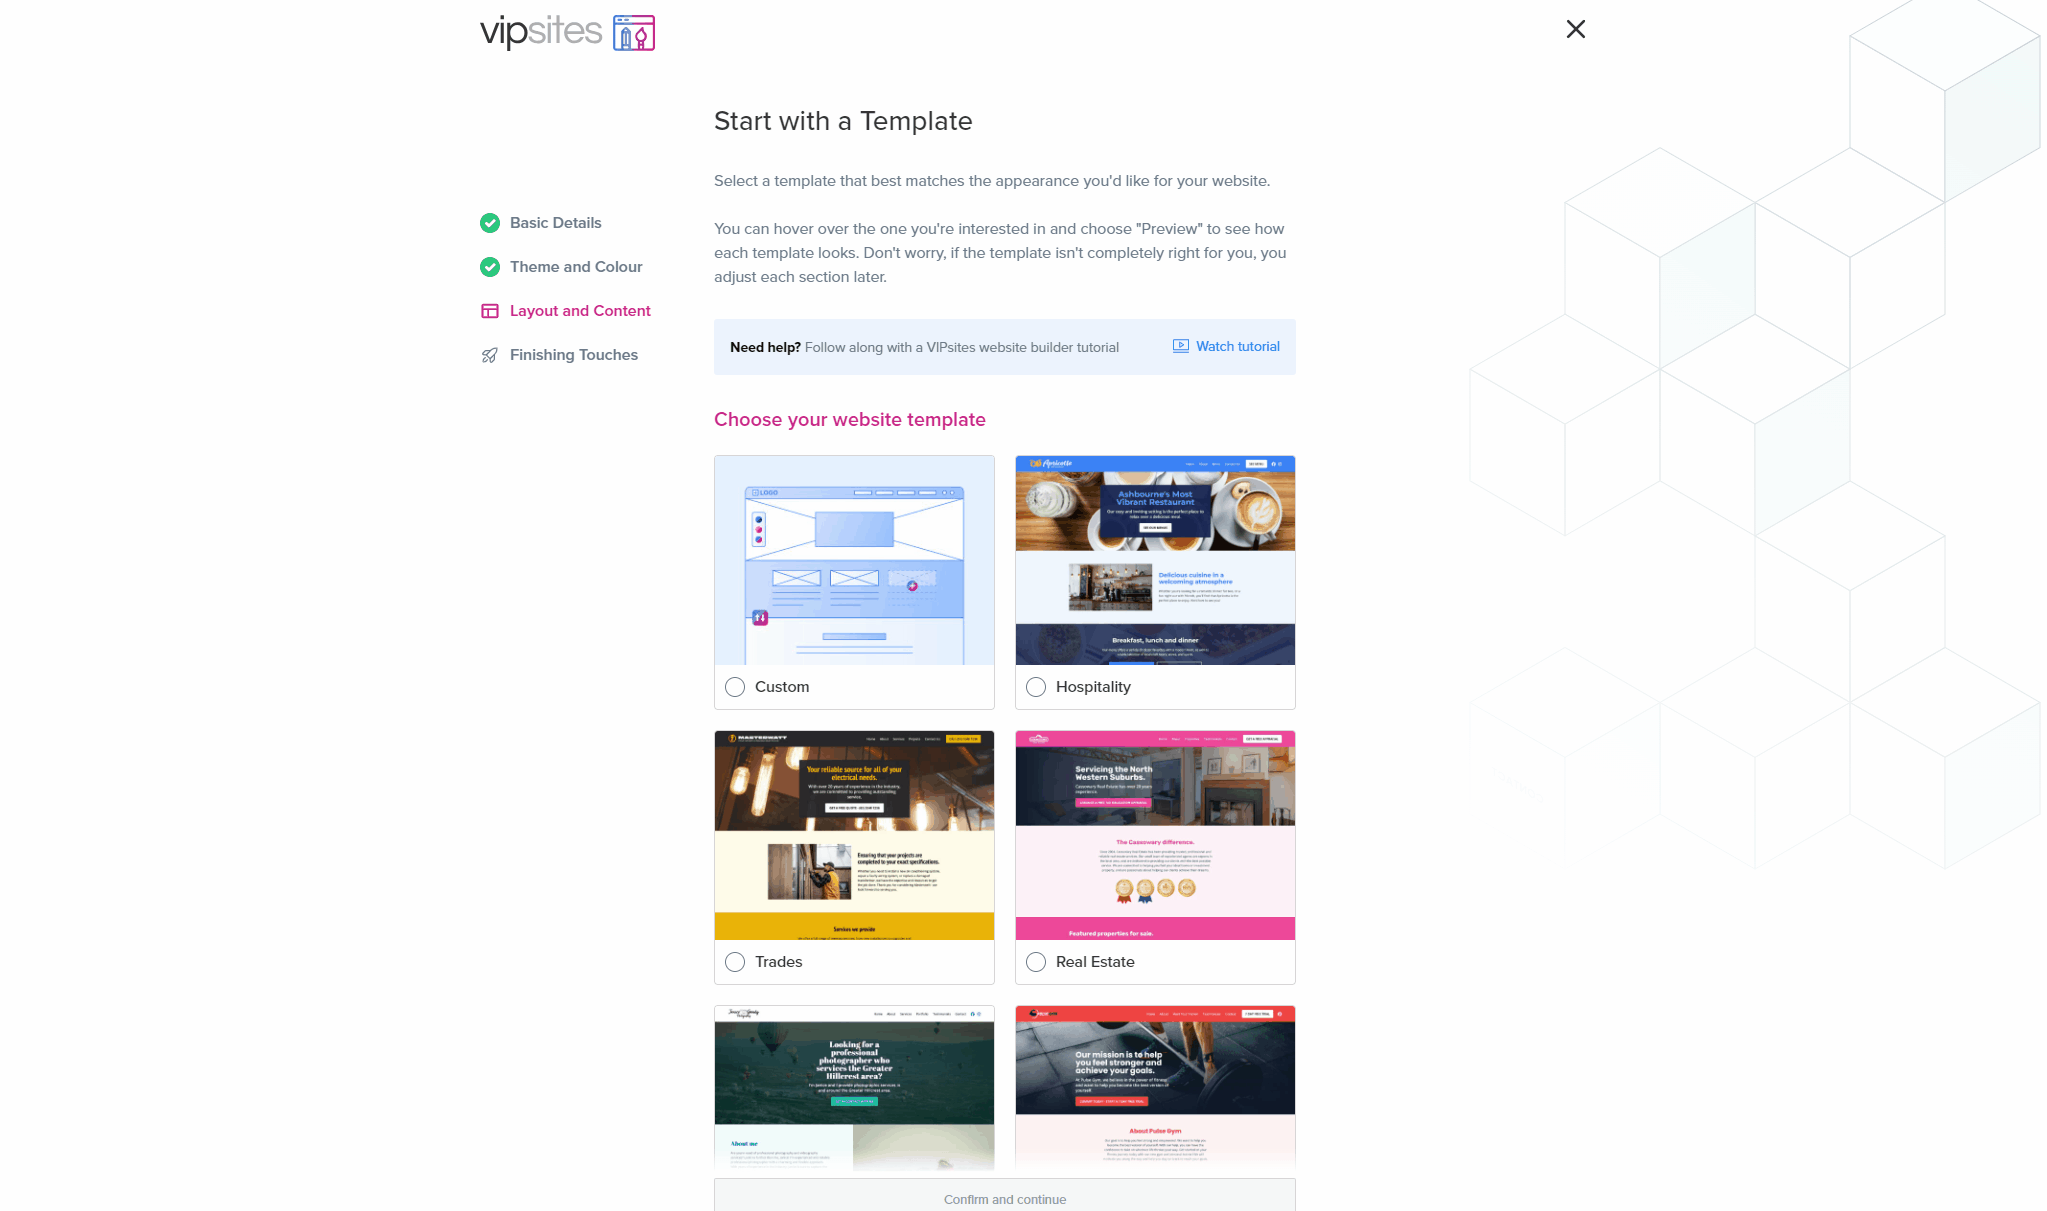
We’ve created a few different customisable templates for all kinds of businesses. Feel free to choose a template that matches or closely matches your type of business, and then move on to the next step by clicking “Confirm and Continue”.
Alternatively, you can choose the “Custom” option if you’d like. This option will give you a blank template, which you will customise in the next steps.
More on website layouts: Website Layout Ideas
Add or remove sections
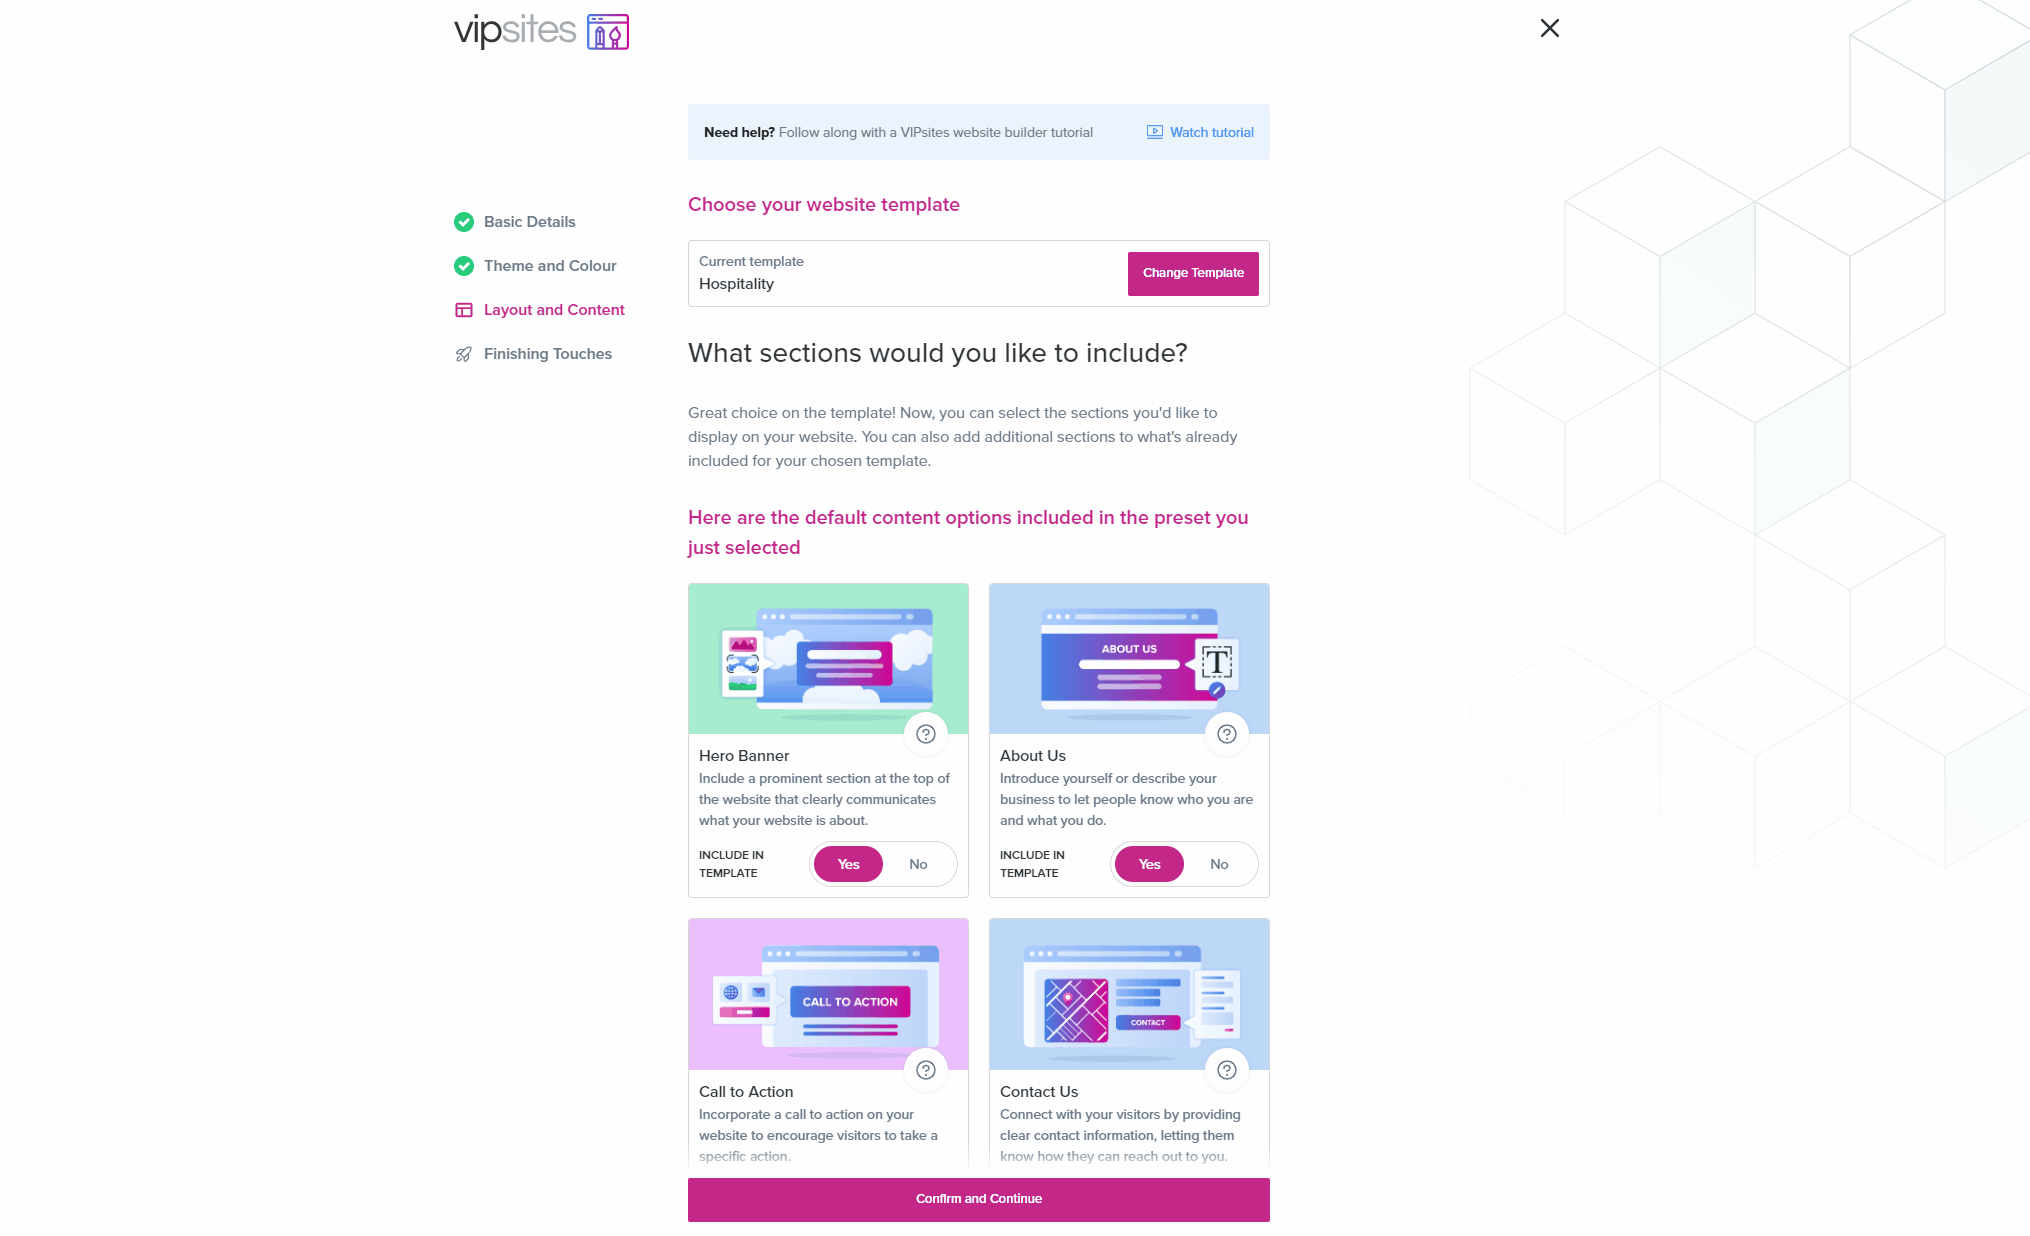
List of sections you can add:
- Hero Banner: This is a prominent section that will appear at the top of your website.
- About Us: Use this section to tell potential customers more about your business.
- Service List: Include a list of services you or your business offers on your website.
- Gallery/Projects: Display your projects, products, and services to visitors on your website.
- Biography: Share a biography to let your website visitors learn more about you.
- Call to action: Incorporate a call to action on your website to encourage visitors to take a specific action.
- Team: Introduce the team members behind your company to your visitors.
- Testimonials: Feature testimonials from satisfied customers on your website to build trust and credibility.
- Frequently Asked Questions: Include common or expected questions from customers here and provide answers.
- Contact Us: Connect with your visitors by providing clear contact information and letting them know how they can reach out to you.
- Instagram Feed: Display your Instagram feed directly on your webpage to showcase your latest posts.
You won’t be able to edit your sections here. Don’t worry! You can edit your new website’s content once you have completed this process.
Adjust your colour scheme
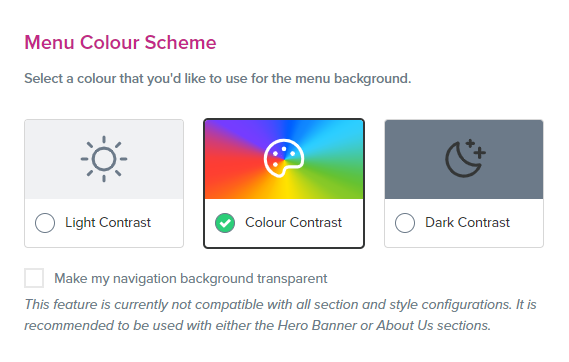
- Light Contrast: This will make the background of your navigation menu white.
- Colour Contrast: The colour you chose earlier will be used as the navigation menu’s background.
- Dark Contrast: This will make the background of your navigation menu dark grey.
Edit your website’s menu layout
By default, your website’s menu labels won’t be visible in the navigation menu unless you click “See Menu”. If you’d like to make a menu item visible in the navigation menu, check the box next to that menu item.
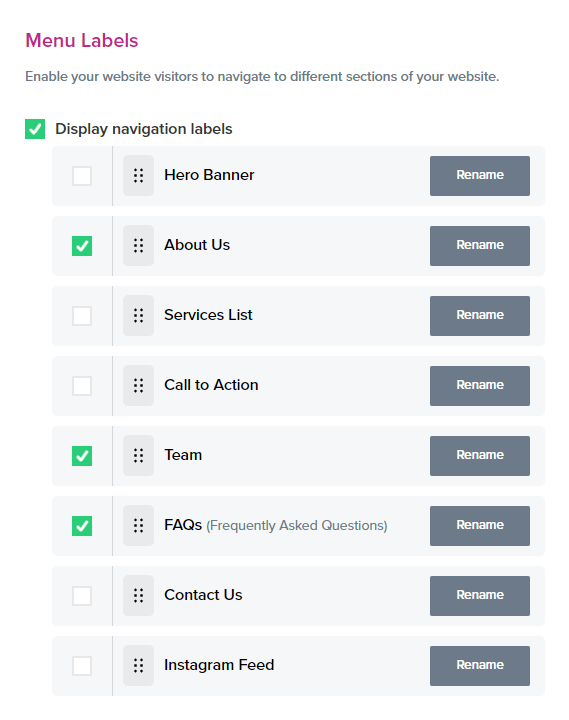
You can also:
- You can reorder the menu by clicking on the drag handle
 next to a menu item and moving it to a different position in the list.
 - Rename the menu item by clicking Rename.
Add a Call To Action
Here, you can add a Call To Action button to your website. This button encourages people to perform a specific action on your website. For example, you might want to encourage visitors to view your restaurant’s menu or book a consultation.
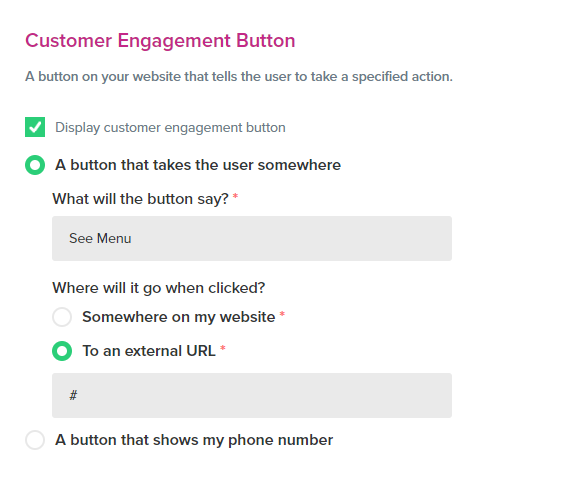
Tip: Be direct and use action words. E.g. “Browse our menu”, “Contact us today”, or “Order Online Now”.
Add Social Media Links
You can also optionally add links to your social media accounts.

There are two check boxes in this section. There are:
- “Display my social media links in the header”: This will display links to your social media accounts in your website’s navigation menu.
- “Add social media links to the footer too”: This will display links to your social media accounts at the very bottom of your website, in the footer.
Our website builder supports adding links to the following social media platforms:
- X (formerly Twitter)
- Tiktok
- Youtube
Add the final touches
SEO
Site Title
This is the title that will appear for your web page in search results. Here’s an example:
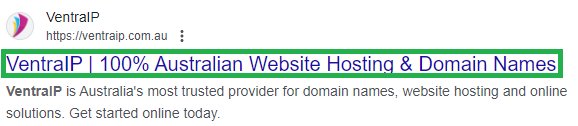
Here are some quick tips for writing a good meta title:
- Include your business’ name
- Tell people what you do. E.g. “Jason’s Plumbing Services”
Description
This is the description that will appear on your web page in search results. Here’s an example:
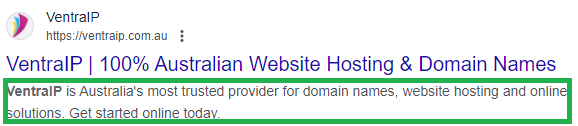
Use the meta description as an opportunity to encourage people to visit your website. Here are some quick tips for writing a good meta description:
- Mention your expertise and/or how long you have been in business.
- Tell potential customers what you can do for them and mention your key products/services.
- End the description with a call to action. E.g. “Give us a call today!”
- Aim for 110 – 160 characters.
Favicon
This is a small icon for your website that will appear in browser tabs, bookmarks and search results.
Here’s where people will see your logo in their web browser:
![]()
People will also see your logo in search results:

Launching Your New Website
That’s it! The final step of the process allows you to launch your website. Simply check the box acknowledging you understand the changes that will be made and then click Launch Website!
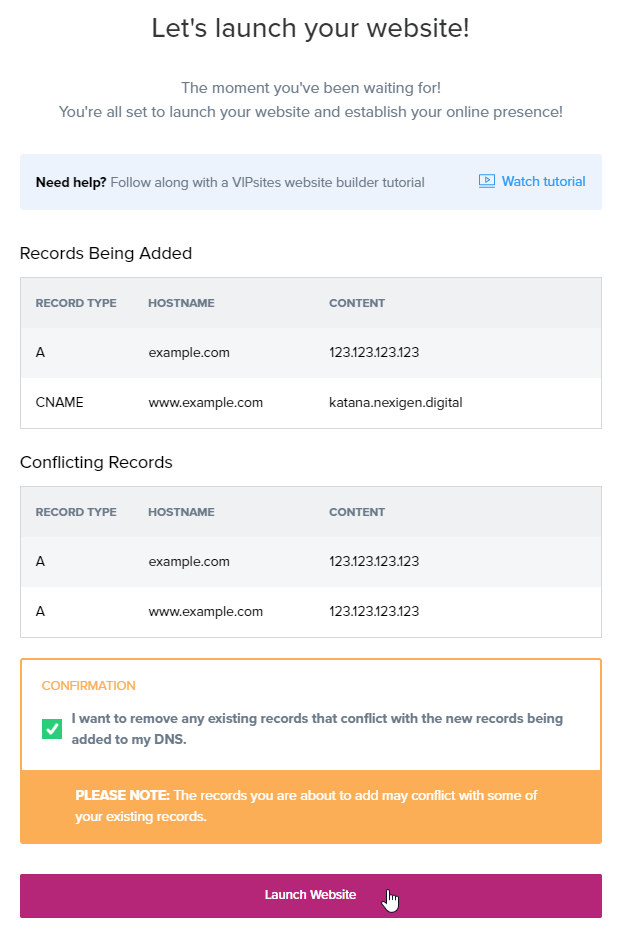
These changes will make your new website live. If you have an existing website that uses the same domain name, it will no longer be accessible. If you’re unsure about this step of the process, feel free to contact our technical support team for assistance.
Keep in mind that you will need to register a domain name before you can make your website live on the internet. If you haven’t done that, feel free to register a domain name via our website.
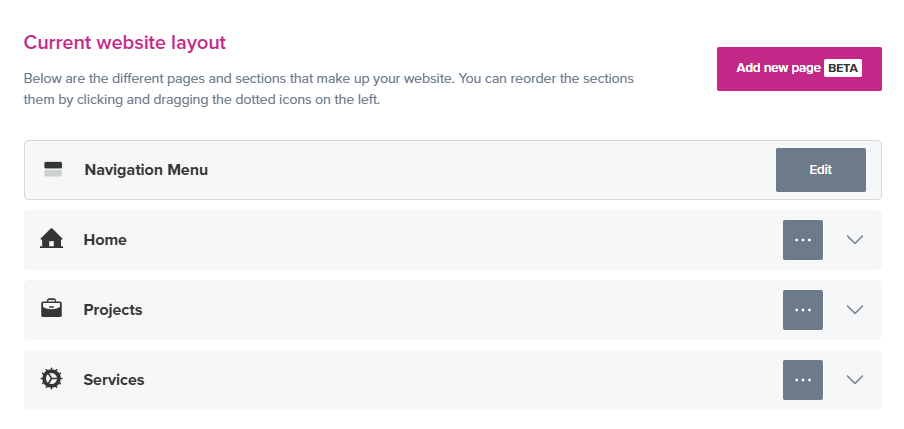
Adding more pages to your website
Our team recently implemented the ability to add new pages to your website. To do so, navigate to VIPControl > My Services > VIPsites > Click “Manage” > Scroll down to “Current website Layout” and then click “Add new page.”. Please keep in mind that this feature is currently in Beta.
Changing the Content on Your Website
Our website builder will automatically add relevant content to your website. If you’d like to change that content, you can do so via VIPControl > My Services > VIPsites > Click “Manage” > Scroll down to “Preset and Content” > Click “Edit” next to the section you want to edit.
Wrapping Up
Creating a professional and effective website for your small business is not only achievable but also free with VentraIP’s website builder. By following the steps outlined in this guide, you can establish a strong online presence that reflects your brand and engages your target audience. With careful planning, thoughtful design, and the right content, your new website can become a powerful tool for reaching new customers and growing your business. Don’t let the perceived barriers of cost and technical difficulty hold you back. Start building your free website with VentraIP today and watch your small business thrive in the digital world.