Support Centre
Find the answers to your questions and get the support you need with the VentraIP help centre.
Browse by Popular

Domain Name
- What is a domain name?Eligibility criteria for registering .AU domain namesPremium domain names explained

Web Hosting
View All
Email Hosting
View All
Google Workspace
- Getting Started with Google WorkspaceGoogle Workspace support resourcesTransferring an existing Google Workspace service to VentraIP

Account
- How do I reset my VIPcontrol password?How do I create a VentraIP account?How can I see who accessed my VentraIP account?

Troubleshooting
- How do I clear my browser cache?Troubleshooting a ‘500 internal server' errorTroubleshooting with a ping test
Adding a subdomain to Free DNS Hosting
Sometimes you need to create sub-domains for your domain name, such as mail.mydomain.com and staging.mydomain.com. So we’ve created a simple guide on how to do this inside VIPcontrol.
Before Proceeding
If you have an existing website, emails or other service setups for your domain name. Switching to our Free DNS Hosting system may cause issues, as you may have an existing DNS configuration. If you’re not sure, feel free to speak to our technical support team about this before proceeding.
Please make sure you have Free DNS Hosting enabled on your domain name before proceeding, follow these steps to do so.
Creating a subdomain
- Log in to VIPcontrol.
- Navigate to My Services > Domain Names.
- Click the DNS button next to your domain name.
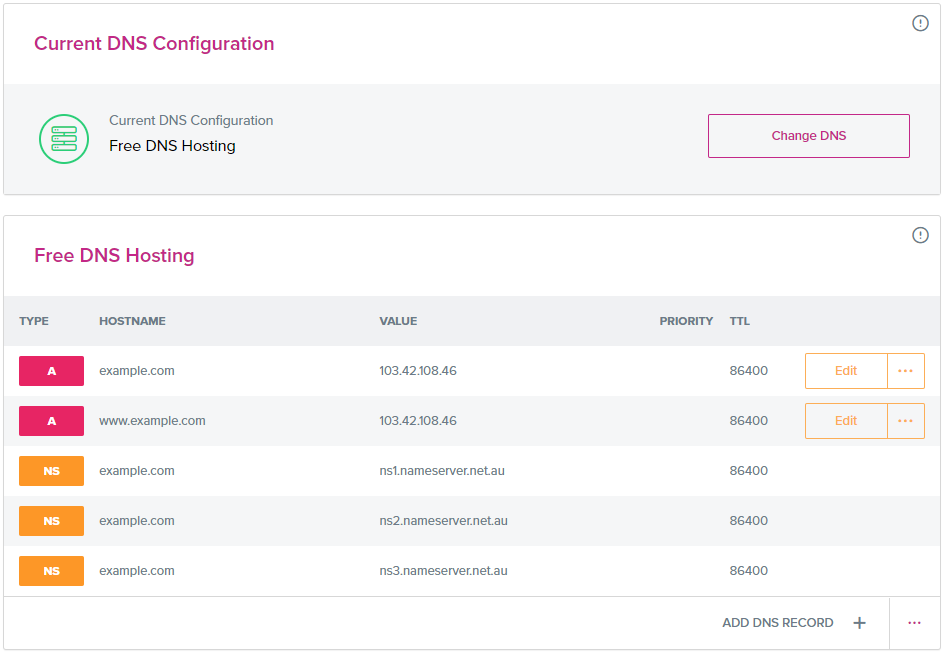
- You will see this interface if you have enabled Free DNS Hosting. Follow this guide, if you do not.

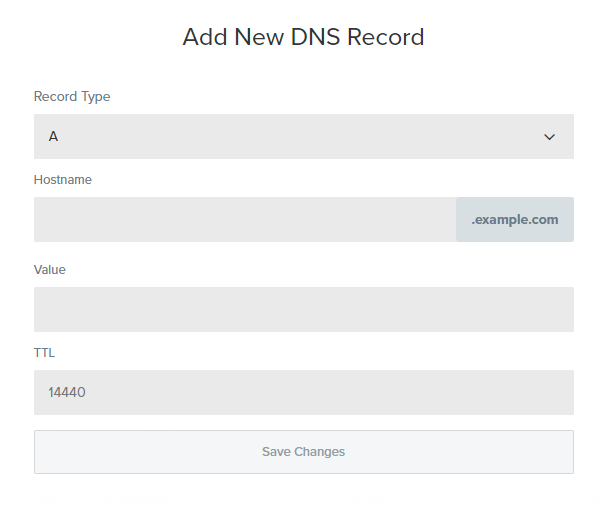
- To add the new record, click Add DNS Record at the bottom of the table. Which will show this interface.

- First, change the Record Type to A if you’re pointing your subdomain to an IP Address, or CNAME if you’re pointing your subdomain to another domain or sub-domain.
- In the Hostname field, input the part of the sub-domain you want to create (e.g. If you want shop.mydomain.com, simply put shop in this field).
- In the Value field, if you set the Record Type to A, this needs to be an IP Address. If you set Record Type to CNAME, you can input another domain.
- TTL stands for Time To Live, measured in seconds. You can set this to 3600 for 1 hour, or 14400 for 4 hours (this is the amount of time you’re telling DNS servers around the world, to re-check/re-cache your DNS records).
- Now, simply click Save Changes
Please be advised that any DNS changes you make, will take 2-8 hours to propagate (take effect).

We Are Here to Help You
Get in touch with one of our local experts at any time.