
Support Centre
Find the answers to your questions and get the support you need with the VentraIP help centre.
Browse by Popular
Domain Name
- What is a domain name?Eligibility criteria for registering .AU domain namesPremium domain names explained
Web Hosting
View All
Email Hosting
View All
Google Workspace
- Getting Started with Google WorkspaceGoogle Workspace support resourcesTransferring an existing Google Workspace service to VentraIP
Account
- How do I reset my VIPcontrol password?How do I create a VentraIP account?How can I see who accessed my VentraIP account?
Troubleshooting
- How do I clear my browser cache?Troubleshooting a ‘500 internal server' errorTroubleshooting with a ping test
Creating new user accounts in WordPress
Creating a user
- Login to your website’s dashboard (e.g. http://my-domain-here.com/wp-admin)
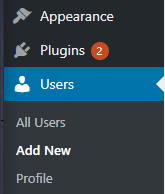
- Click on the Users tab to the left of the page, then click Add New.
- Input the following under Add New User.
- Username: This is a required field, and the username can be whatever you like.
- Email: This is a required field, make sure it’s an email address you or the user have access to.
- Firstname: The user’s first name.
- Lastname: The user’s last name.
- Website: The user’s website, this is optional.
- Password: This will be generated for you, and can be changed later.
- Send User Notification: Optional – emails the user, letting them know their account has been created.
- Role: Set the user’s role, keep in mind that the different roles provide different user permissions.
- Click Add User.
User Roles and what they mean
When creating a user you can set a “role” for that user, which gives them different permissions when they login to the WordPress dashboard. Here is a list of the different roles and what they mean:
- Administrator: Full access, this user can do anything they want once they’ve logged in
- Editor: Can publish and manage posts, including the posts of other users
- Author: Can publish and manage their own posts only
- Contributor: Can write and manage their own posts, but cannot publish them
- Subscriber: Can only manage their user profile

We Are Here to Help You
Get in touch with one of our local experts at any time.